Jupyter远程调试docker容器
场景
上一篇写了如何使用vscode远程连接服务器的docker容器进行debug,这篇简单记录一下如何使用jupyter远程连接服务器的docker容器。
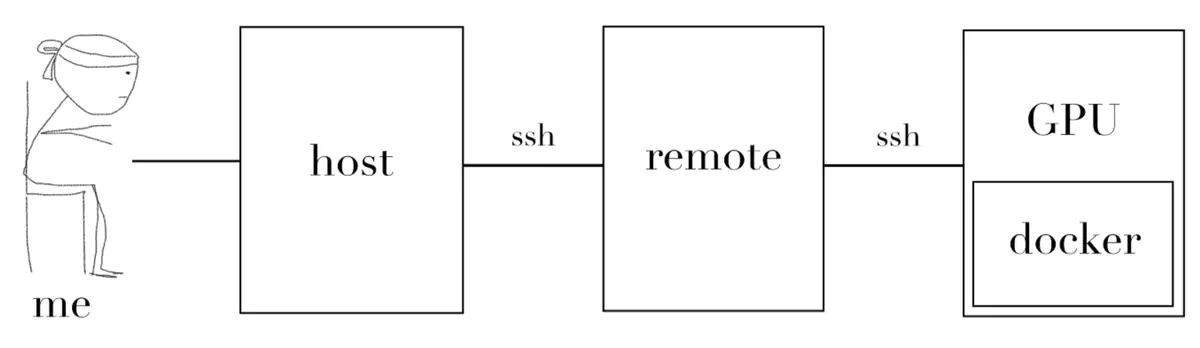
场景: 本地win10笔记本,远程连接远程ubuntu服务器的docker容器
使用jupyter相对于vscode的优势:
- 动态笔记脚本,Markdown与code的完美结合
- 画图,模型训练
- 快速运行下载的开源
ipynb文件
当然对于神经影像pipeline项目,个人更偏爱vscode去debug
言归正传:
一、服务器端容器设置
1、容器启动,设置端口
# 建议提前启动一个tmux窗口,防止远端服务断电断网
docker run -it --rm --gpus all -p 9999:9999 mindsgo-sz-docker.pkg.coding.net/neuroimage_analysis/base/msg_baseimage_cuda11:v1.1
2、生成notebook 配置文件
apt-get install jupyter
apt-get install ipython
jupyter notebook --generate-config
3、生成密码
jupyter notebook password
此时会在/root/.jupyter/jupyter_notebook_config.json中生成密文。复制该密文,如sha1:56a8dc892ab2:239cb1f1bda7f8614e546853e8298efc566489d9
4、修改配置文件
在/root/.jupyter/jupyter_notebook_config.py中添加这几行
c.NotebookApp.ip='*'
c.NotebookApp.password = u'刚才复制的那个密文'
c.NotebookApp.open_browser = False
c.NotebookApp.port =9999
5、安装python3-dev
提前解决jupyter无法连接python3服务器内核 一直显示正在连接服务器的问题
apt-get install python3-dev
6、安装ipykernel
# 将当前python环境添加进jupyter kernel
pip install ipykernel
python -m ipykernel install --name cye(你的环境名)`
7、启动jupyter
jupyter notebook --ip=0.0.0.0 --no-browser --allow-root --port 9999
二、win10本地相关配置
假设windows环境已成功安装anaconda和jupyter
1、连接远程服务器:
打开Anaconda prompt终端,连接远端:
ssh -L 9999:localhost:9999 [用户名]@[主机IP]
此时需输入远端服务器密码(不是docker容器中刚才新设的密码)
2、浏览器打开jupyter:
本地浏览器输入http://localhost:9999
然后输入登录Jupyter Notebook的密码(即docker容器中刚才新设的密码),选择刚才新建的kernel环境 (e.g., cye)。
BINGO!
三,参考资料
Chenfei Ye
A connectome weaver
The brain’s billions of neurons resemble trees of many species and come in many fantastic shapes. Only the most determined explorers can hope to capture a glimpse of this forest’s interior, and even they see little, and see it poorly.